
How to protect your WordPress website from hackers in 9 steps
When it comes to website management, best practices emphasize that prevention is better than cure. Rather than expend time worrying HOW the hack occurred, proceed with preventive measures, and elimination of any traces that might be left behind.

Hacking Prevention/ Recovery Checklist:
Note: it’s helpful to run two browser windows so you can monitor the cPanel changes on the live website site so you know if anything breaks as you work through the changes.
1 – Start in the Hosting Account Control Panel
Change the account password: In your cPanel, Plesk, SPanel, Hsphere control panel,
The average WordPress hosting provider gives you almost nothing to work with in terms of a control panel. Effectively you pay extra and get less – and often there’s not even a file manager! I always use and recommend premium shared hosting providers with WHM cPanel because you have full control over many aspects of the site’s security and performance. It’s critical that you protect your website control panel login page with strong ID and password combinations.
- Change the account password which prevents further illegal cPanel access:
- Your password should be 18 characters secure, as generated by the cPanel tool.
FTP Users: there should (usually) only be ONE. Check for and delete any unknown FTP users.
WP Database: in the Control Panel, go to MySQL databases and change the WordPress database password. Edit the /wp-config.php file and replace the old password. This stops the bad guy from getting straight back in if it was a database access hack.
Security Headers: add security headers into the .htaccess file before the # BEGIN WordPress line. This limits the sorcery that can be performed by an external threat.
- be sure to monitor the impact of this change on the live site as in rare cases, it may create a conflict.
Copy and paste the code below to thwart some cross-site attacks:
Really Simple SSL Headers
Header always set Strict-Transport-Security: “max-age=31536000” env=HTTPS
Header always set X-Content-Type-Options “nosniff”
Header always set X-XSS-Protection “1; mode=block”
Header always set Expect-CT “max-age=7776000, enforce”
Header always set Referrer-Policy: “no-referrer-when-downgrade”
Header set Content-Security-Policy: upgrade-insecure-requests
End Really Simple SSL Headers
SALTS: replace the “salts” in /wp-config.php to forcibly “log-off” anyone still logged in.
To get a fresh set, go to:
Bad Files: delete any “dodgy” php files you can see in the root directory. Note that WP core files are usually prefixed with “wp” and should not be touched. Look at file dates and if there are file names with odd names and dates different to WordPress files, regard those with suspicion… We will assess those with Wordfence in later stage…
Be careful: – the one file you must not delete is /wp-config.php
PHP: should be running the current mainstream version – PHP 7.4 – which is more secure and faster.
SSL Certificates: make sure your SSL certificate is current and the site is running in HTTPS mode in both the front end and back end.
NOTE: As a general rule when creating a new hosting account, I never use the default 8-character cPanel user name based on the domain name. Doing so gives the attacker 50% of what he/she needs to gain access, and they then only need the password…
cPanel password hacking tools: are readily available, yet so many people never think to protect their account with a secure password.
2 – Reinstall WordPress
As soon as you can, get into WordPress Admin and run check the version of WordPress:
Reinstall: run the WordPress “Upgrade/Reinstall” because that deletes and replaces ALL the /wp-admin/ and /wp-includes/ contents. This immediately removes any dodgy code/files inserted by an intruder.
Apply Updates: update all WordPress plugins and WordPress themes to ensure security patches are applied, and all files are replaced. Set all plugins and themes to “auto-update” – this is an important WordPress security procedure.
Set WP to auto-update to the latest WordPress version.
3 – Check WordPress "Administrator" Users
Administrator Users: look for dodgy Admin users, delete any you don’t know (allocate content – if any – to a known good user so you don’t delete your posts and page accidentally)
If you’ve previously added external users for 3rd party support, reset those to “Subscriber” for now. The fewer administrator users you have, the fewer chances for a hacker to crack a weak password and access to your site as an Administrator.
Review/change the User’s “Nicknames” so that the actual User Names are never displayed in meta on posts etc.
4 – Change all WordPress administrator passwords
Steps to secure your WordPress login include both secure username and password combinations and 2FS (below). Make sure these are all WordPress-generated SECURE passwords!!! No silly word/name/date combinations as these are easily hacked by a determined adversary.
This includes every Administrator email address password… Doing so provides additional protection for WordPress websites against brute force attacks.
5 – Block XML RPC
This is one of the ‘vulnerabilities’ most people are blissfully unaware of. It does serve a legitimate purpose for users doing remote publishing etc, but the majority of WP sites will never need it. Block it, because it is a threat! Its an important part of securing your WordPress website.
Block XML-RPC fully: I use the Disable XML-RPC-API by Neatma – it also allows restriction of the REST API. Wordfence also has an option to disable it.
6 – Restrict REST API to logged-in Users
Block REST API: for non-logged-in users – plugin is: Disable WP REST API by Jeff Star
7 – Implement Security Plugin/s
In my opinion, the best WordPress security plugin is Wordfence.
If you’ve been hacked, use Wordfence.
Wordfence: it’s a great security plugin but the settings are extremely complex and very difficult for most people to configure correctly. For that reason, even with Wordfence installed, the “default” settings don’t provide full protection. The default Scan settings are not rigorous enough to detect issues in themes and plugins, images or files outside WordPress etc.
To help you with that, the following Import Code – will configure Wordfence to the same levels I use myself and immediately secures multiple danger points.
Go to Wordfence | Tools | Import/Export Options
Copy and paste the code at the end of this page into the Wordfence “Import” box
This will implement the Wordfence web application firewall WAF with optimal settings.
Malware Scanning: get a Wordfence full scan scan going ASAP and use the buttons provided to:
— delete any files marked as non-WordPress
— replace those that are modified
If you are in “Prevention” mode…
Use Block Bad Queries as your web application firewall.
Use Limit Login Attempts as your Brute Force Login attack protection. Reduce login attempts to 3, with a 90-minute lockout for exceeding 3. Set Blocking after 4 attempts to 9999 hours…
Disable file editing from inside WordPress by adding the following line of code into the wp-config. php file.
define( ‘DISALLOW_FILE_EDIT’, true );
8 – Implement 2 Factor Authentication (2FA)
Add an additional safety factor to prevent unauthorised access. You can do this by either:
Wordfence 2FA settings, if you use Wordfence…
With the WP 2FA plugin which works in conjunction with the Authenticator app on your phone. When an administrator logs in, a 6-digit code is sent via SMS to the phone that’s configured on your account.
9 – Get your website onto Cloudflare
A Cloudflare Free plan provides significant additional security layers. AND makes your New Zealand website load faster – particularly if you’ve got it hosted in the US, Aussie, Singapore, Europe etc.
Configuration is moderately complex:
- Create a Cloudflare account for your Domain. This imports your current DNS settings…
- You will be given the Name Server records to change on your domain registration account. Do that after configuring your Cloudflare account settings for your website.
Configure the account on Cloudflare account.
- You could use the WP Cloudflare Super Page Cache or the official Cloudflare plugin… these will configure many of the settings from within the plugin but neither are perfect at it.
- I think its best to do it manually…
Manual Cloudflare Settings:
#1 – Page Rules – these are essential because it controls what’s indexed on your site. See section** at end of the page.
#2 – Firewall | Bots – activate “Bot Fight Mode” which challenges requests that match patterns of known bots, before they #3 access your site. This feature includes JavaScript Detections.
#3 – Scrape Shield – activate to stop people hot-linking to your images
Enabling Cloudflare: going live
Go to your Domain Registration account.
Edit the Domain Name Server records: replace your current DNS with the new one provided in your Cloudflare account.
Wordfence Import Code *
The following code will configure the Brute Force Attack section to limit login attempts, set password strength and scans etc to an adequately rigorous level.
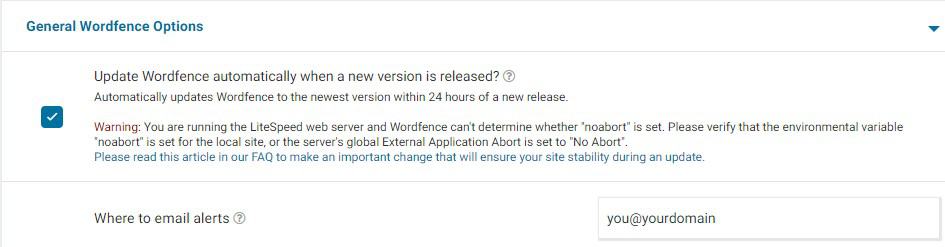
22154b96bb6e8e8306345e031f10bbe2bab93fd7605e09f9f9254ebe01cb0f8f14ee578190c148e4a0cd6a465bdb5fbcf2b9c83d977e1e34b35ff8c011c4f9d61976e948032a6bd90b5869609b182178After importing it, go to General Wordfence Options and change the “Where to email Alerts” address.
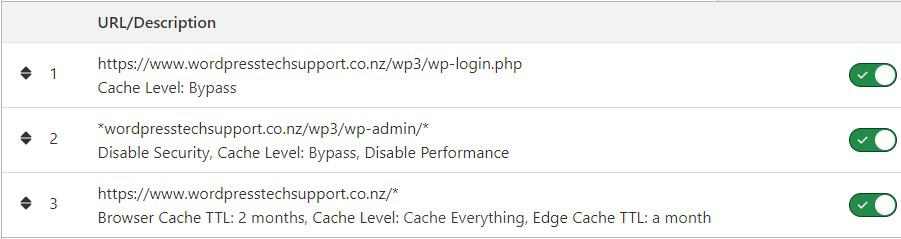
Cloudflare page rules **
Getting these configured makes a huge difference to what is indexed. Preventing indexing of /wp-admin/ is essential.
Example page rules:
- Use the full path to the wp-login.php file and /wp-admin/ directory…
- The order in which the rules are loaded is critical!
- As are the settings within each rule…
Strong passwords keep a website safe.
Security plugins guard known security vulnerabilities and help prevent security breaches
At the end of the above exercise, you’ve made significant changes that will boost security and help secure your WordPress hosting and your WordPress login page against hackers.
Need help to secure WordPress site from hackers?
If all of this seems daunting, help is at hand. I’m happy to install/configure all of the above for you… Contact me today…
References: WordPress Security
- https://wordpress.org/support/article/hardening-wordpress/
- https://www.searchenginejournal.com/wordpress-seo/protect-from-hackers/
Last Updated 3 years ago ago by Ben Kemp